


Sunday, March 27, 2011
Iris Folding Kimono
Here's an iris folding pattern I made for my new Kimono Die Cutter. I'm a newby so I hope I did it right!

Friday, March 25, 2011
Iris Folding part 2


Thursday, March 24, 2011
I tried Iris Folding

Tuesday, March 22, 2011
Sliding Window Card


Materials:
Cardstock in three colors
Craft knife
Ruler
Pencil
Scor-it board (or other scoring tool)
Tape
Scissors
Hole punch
Ribbon
Steps:
Cut each piece of cardstock as follows:
Main card 5 ½” x 8 ½” (Olive)
Window card 3 ½” c 3” (Cream)
Slider 4 ½” x 4” (Maroon)
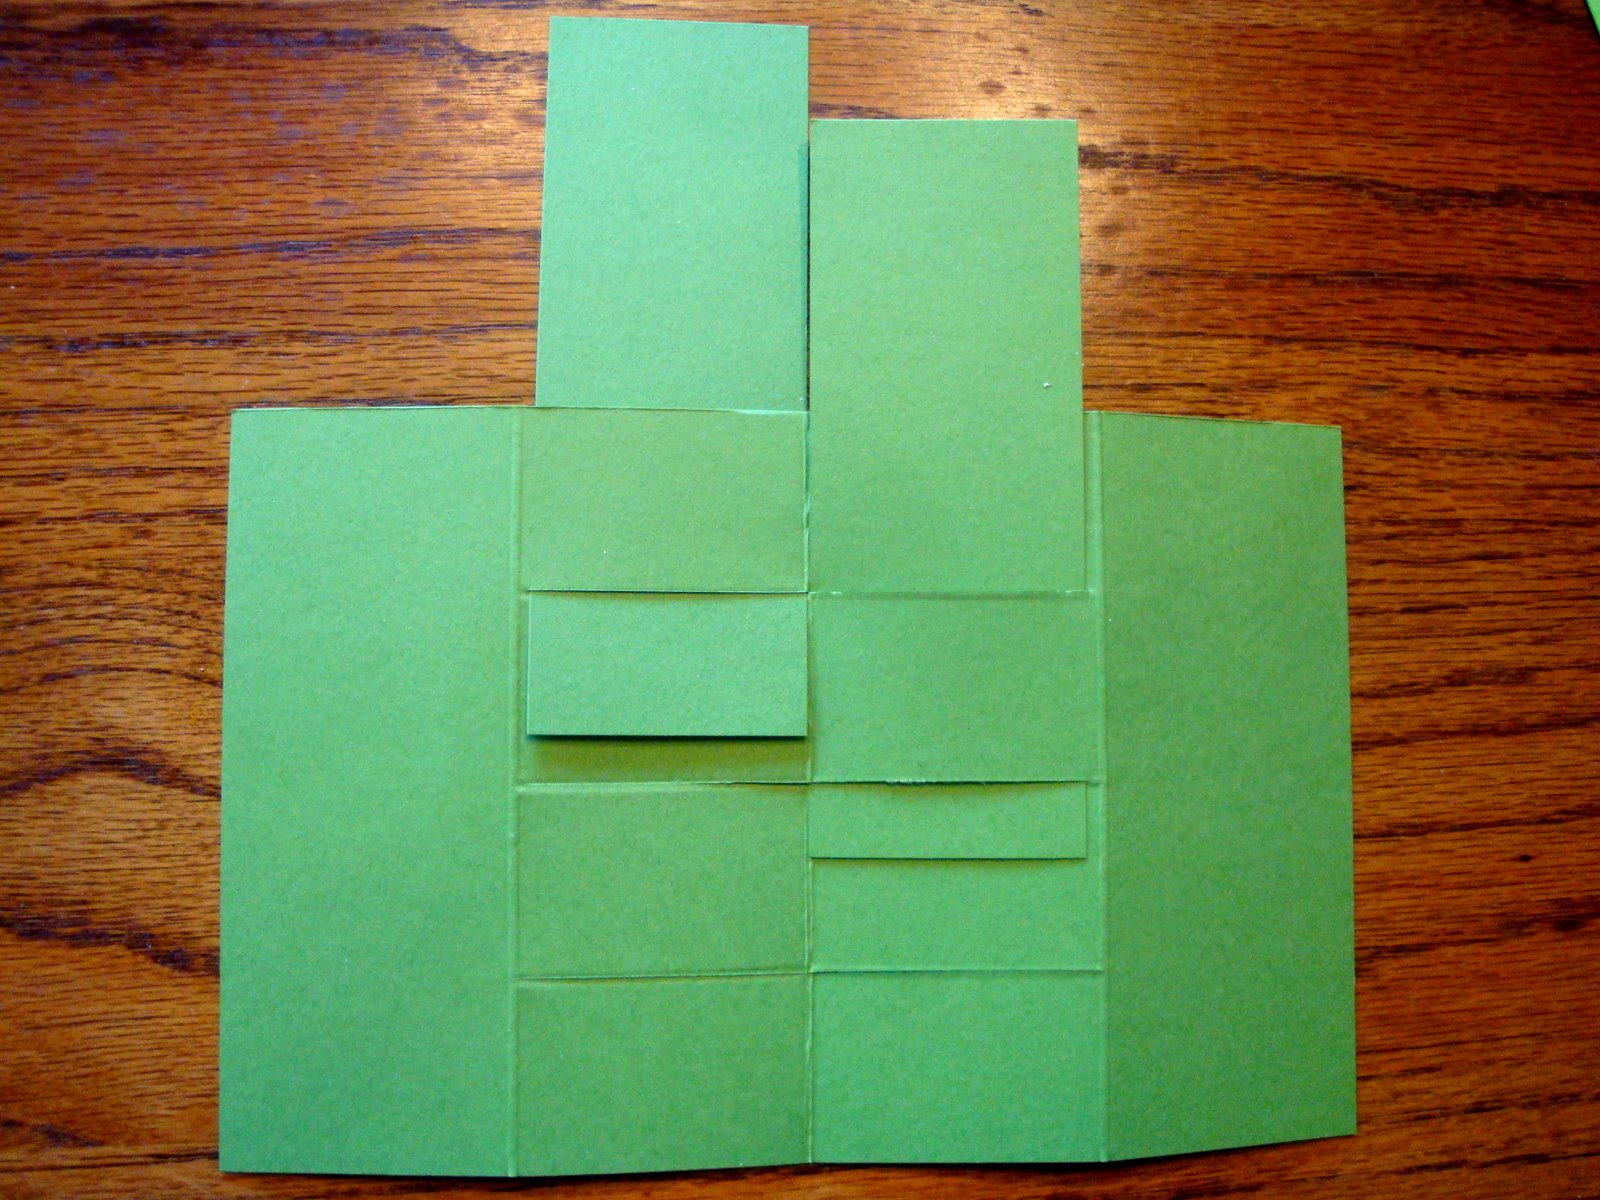
Follow the illustration to score and crease the three components of the card.
Use a craft knife to cut two lines in the main card as shown and one line in the slider as shown.
Use scissors to trim the four corners of the window card as shown.
Insert the window card into the two parallel cuts in the main card as show. Tape down the window card tabs so they are entirely inside the two cuts on the main card.
Insert the slider as shown. Tape the slider closed. Glue the tab on the main card as shown and close the card tightly to secure.
Pull the slider out from the right side of the card and punch a hole in the end. Tie ribbon through the hole. Push the slider back inside the card. Use the ribbon to pull the slider out.
Decorate the card any way you wish. Enjoy!


Thursday, March 17, 2011
A Little History
Fifteen years ago, a grand theft took place. I stole my wife Carla’s hobby and turned it into my business.
Rubber stamping was introduced to our house many years before said theft by our friend Jessica from Arizona. Her passion for collecting brought her to California for shopping expeditions. Carla caught the fever and the two of them (with me frequently tagging along) would make the pilgrimage to the Mecca of stamping, Stampa Barbara. Many trips and thousands of stamps later, it dawned on me that there must be lots of Jessicas and Carlas out there and that my habit of constant doodling had found a happy outlet.
I began by drawing what I liked which was mostly irreverent retro 50s images. I put together a small catalog, took out an ad in Rubberstampmaddness and waited for the orders to flood my mailbox. No flooding took place. I arrogantly though everyone would love my little drawings. I failed to employ the number one rule of commerce, know thy customer! So it was back to the drawing board with lots of input from Carla and Jessica and the Michael Strong Cloisonné Collection was born. Our little company slowly began to grow.
Then one day while I was doing a demo at a stamp convention I met a wonderful funny lady named Kelly Ehrlich. She was so enthusiastic and engaging. We talked for quite a while before she revealed that she was the producer of a TV show called The Carol Duvall Show. She asked me if I would be interested in appearing. I knew nothing about the show or the legendary Carol so I said sure. A few months later, I found myself on a soundstage in Burbank ready to tape my first Carol Duvall episode. I met Carol on the set that day. I was petrified but Carol talked to me and said “just be yourself and follow my lead”. Her calm and friendly manner helped me through that first show without a retake! Thank you Carol for being my friend and mentor.
After that show, lots of other opportunities have come our way. I became friends with Carol’s design collaborator Cherryl Greene who later became the executive producer of The Scrapbook Lounge, a show I adored working on. Even though the show is gone, all the designers became like a little family and we are still close. I have the best job ever! I get to travel the world and share my passion for rubber art.
I am fortunate to have the support of my wonderful wife and family as we keep growing and growing. We are so blessed to have made so many good friends all over the world. Thank you all for fifteen wonderful years!
Monday, March 14, 2011
Interlocking Frame Card

Interlocking Frame Card
Material
MSRS Mosaic Frame stamp
MSRS Cloisonné Medallions stamp
Black cardstock
Grey Cardstock
MSRS Constellation Swirl silver cardstock (or similar)
MSRS Silver Dollar embossing powder
Versamark inkpad (or similar)
Heat tool
Paper cutter
Scissors
Circle punch (1 1/8”)
Double sided tape or glue
Craft knife
Straightedge
Cutting mat
Steps
Cut the black cardstock to 10”x 7” and fold in half. Fold the left and right edges of the card to the center fold line to make a cupboard fold card.
Cut the Grey cardstock slightly smaller than 5” x 7” and attach it to the inside back of the card.
Ink and stamp the Frame stamp and one of the small Cloisonné Medallion stamps onto the silver paper and heat to emboss.
Cut the frame stamp as shown in the picture using the paper cutter and the craft knife and scissors. Punch and cut out the circle as shown.
Attach the large frame just to the left side of the cupboard folded card using tape or glue. Be sure to apply adhesive only to the back of the frame where it comes in contact with the left panel of the card.
Align the small frame inside the large frame and attach it in the same manner as the large frame. This time, glue or tape it to the right side of the cupboard folded card.
Glue or tape the square with the embossed flower to the left side of the cupboard folded card as shown. Glue or tape the two half circles above and below the embossed flower square. Attach them to the right side of the card. Use scissors to cut out the smaller embossed flower and glue it on top of the flower in the square.


Friday, March 11, 2011
Cloisonne Kimono stamp

Tuesday, March 8, 2011
Disappearing Shamrocks Card

The Leprechauns are spreading a little mischief by stealing the shamrocks from my card!
This fun and easy card can be adapted to any season. I’ve made a basic St. Patrick’s Day card to show you how it’s made.
Supplies:
Two shades of green cardstock
Scor-It board or ruler & bone folder
Shamrock punch
Scissors
Pencil
Glue
Steps:
Cut the darker green cardstock into three pieces measuring 8 1/2” x 5 1/2” (1 of these) and 2” x 5 1/2” (2 of these)
Using a scoring tool, score a line at 2 1/8” from the left side of the card. Make two more scored lines the same way. You will have four equal panels measuring 2 1/8” each.
Fold the card in half and lay it on the scoring board with the folded side up against the measuring edge. Slide the card to the left and score at 1 3/8”. Repeat two more times to make four equal panels. NOTE: score just to the horizontal scored line of the card.
Use scissors to cut through the folded card on the three lines you just made. Stop cutting at the horizontal scored line of the card.
Open the card and weave the two 2”x 5 ½” panels through the cut lines as shown. (See the picture of the weaving using the lighter color panels).
Fold the card closed like a cupboard with the two sides meeting in the middle. Glue lighter green panels (4) measuring 1 ½” x 4 ¾” to the front of each “cupboard door” and to the insides of the doors.
Punch some shamrocks in two colors. Glue the lighter ones to the inside of the card as shown. Glue the darker one to the front panels and the inside panels.
Close the card up like bi-fold doors and pry open the card between the two inside panels. The shamrocks have disappeared!
Enjoy!


Subscribe to:
Posts (Atom)